Adjusting the headlights on your vehicle is an important step in ensuring that you have the best visibility while driving, and improves safety on the road. When adjusting the beam pattern of your LED headlights, it is important to aim the headlights so that they provide the maximum amount of visibility without causing glare or discomfort for other drivers.
How do I know if my headlights need to be adjusted?
A (not so ideal) way to find out if your headlights need adjusting is when other drivers are signaling. Mostly oncoming drivers will flash their headlights at you to indicate that your lights are blinding them. This is a sign that it's time to adjust your headlights. Another indication that your headlights need adjusting is if you cannot see 20-30 feet in front of your vehicle, in which case your low beams need to be adjusted. Additionally, if your headlights are shining too high and reaching the tops of trees at night, it means your high beams need to be adjusted.
Instructions for Adjusting Headlights
The process of adjusting your headlights should take between 30 to 60 minutes.
Materials Needed
- Vehicle owner's manual
- Measuring tape
- Screwdriver
- Masking tape or painters' tape
- Dark cloth or cardboard
- A flat wall or surface to park your car 25 feet away from
Step-by-Step Headlight Adjustment Guide
To start off, you need a quality headlight bulb. Otherwise you will not be able to achieve the perfect beam pattern no matter how much you adjust it. For single filament light bulbs, it's important to position the LED chips in a side-by-side orientation, with one set of LED's facing 3 o'clock and the other facing 9 o'clock for optimal results. Now, let's jump into aligning your headlights to achieve the perfect beam pattern.
#1 Find a flat surface to park your car
Make sure your car is parked on a flat surface, with all tires properly inflated and any excess items removed from the trunk. It's recommended to have a half-tank of fuel in the car when adjusting the headlights. If possible, have someone sit in the driver's seat to have more accurate measurements. You want to simulate the normal load you carry in your everyday drive. Park your car 3 feet away from a wall or door, then bounce on all four corners of the car to make sure the shocks are at the correct level. Make sure the air pressure in all four tires is the proper level.
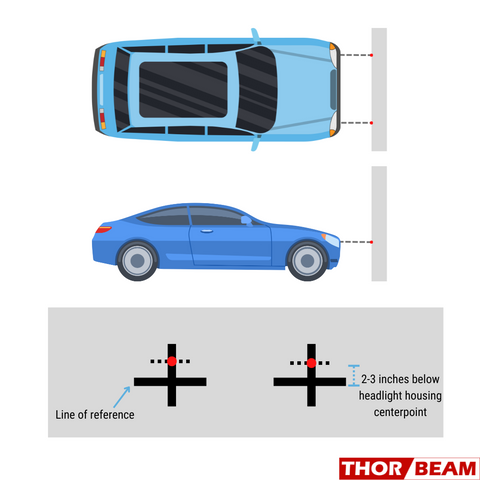
#2 Take measurements & mark with tape
Find the center of your headlights, usually you will see a small dot on the center of your headlight housing, and transfer the centerpoints to the wall. Place masking tape vertically on the wall and use a marker to mark the centerpoint, then place a horizontal piece of tape 2 inches below the centerpoint. If you have a pick-up truck, SUV, or any vehicle with a lift kit where the centerpoint is more that 34 inches above the ground, place the horizontal piece of tape 3 inches below the centerpoint. The tape should not be higher than 3.5 feet off the ground.

#3 Back-up the vehicle 25 feet away from the wall
Back-up the vehicle in a straight line 25 feet away from the wall or door, then turn on the headlights. 25 Feet is a general rule-of-thumb for any vehicle; however some manufacturers specify different distances (refer to the Owner's Manual). Identify the headlamp beam pattern, usually engraved in small letters on the headlight housing. If it reads VOL, use the left side of the beam to align with the tape. If it reads VOR or VO, use the right side of the beam to align with the tape. Locate the screws that hold the headlights. If you need help, refer to the owner's manual. Turn on the low-beam and adjust each headlight one by one, using a screwdriver and blocking one headlight with a cardboard or dark cloth while working on the other.
#4 Make vertical adjustments
To make the vertical adjustment, turn the screw clockwise to aim the headlight higher or counterclockwise to lower it. However, each vehicle may have different settings, so refer to the owner's manual. Adjust the headlights until the most intense part is hitting the center of the tape marked on the wall.
#5 Make horizontal adjustments
Generally speaking, horizontal aim is not adjustable for VOL,VOR, or VO headlamps. Most headlights in the US do not have horizontal adjusters. For horizontal aim, the most intense part of the beam should be to the right of the vertical tapeline. After making the vertical adjustments, adjust the horizontal aim by turning the screws or bolts on the sides of the headlights. Continue making adjustments until you achieve the desired pattern.
#6 Test the headlights
Drive the car at night to test the alignment of the headlights. Take note of any issues and make further adjustments as needed. A good indicator is that your headlights are barely bouncing off the bottom of different street signs. If you notice that street signs are consistently lit up while you're driving, it's a sign that you may need to adjust your headlights to a lower position. You should be able to see slightly beyond 25 feet in front of your vehicle, which is 3-4 cars length.